Patch VMware ESXi using esxcli from Online repository
Every time you are asking the manufacturer for support when something is not working as you want, you will be asked if you have updated the software with the latest patches. Because I have just a few hosts I will be using the command line esxcli software profile update
If you have more hosts and vCener installed you can leverage VMware Update Manager (VUM) which can orchestrate the patching across your cluster where it goes and puts the host in maintenance mode, evacuates VMs via vMotion automatically each time a host within cluster needs to be patched.
Enable SSH on ESXi
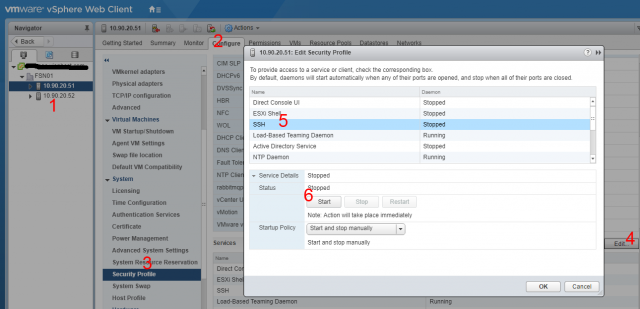
In vSpere Web Client click on the server you want to enable SSH and go to Configure -> System -> Security Profile and click Edit. Follow the steps on the picture below.
Enter maintenance mode
You should shutdown all Virtual machines on the selected host or migrate them to a different host before you put the selected host for patching into maintenance mode.
SSH into your host and type the following command
vim-cmd hostsvc/maintenance_mode_enter
Open firewall ports
You must enable internet access to HTTPS on your VMware host to be able to search and download the latest patches from VMware vib repository.
esxcli network firewall ruleset set -e true -r httpClient
Search the latest VMware ESXi patches
The main command to list all the patches in the VMware vib repository you can use this command:
esxcli software sources profile list -d https://hostupdate.vmware.com/software/VUM/PRODUCTION/main/vmw-depot-index.xml
So to be able to find the patch you need, you have to use grep and specify the version and the last year: grep ESXi-version-year
For ESXi 6.5 in 2019 use the following command
esxcli software sources profile list -d https://hostupdate.vmware.com/software/VUM/PRODUCTION/main/vmw-depot-index.xml | grep ESXi-6.5.0-2019
For ESXi 6.7 in 2019 use the following command
esxcli software sources profile list -d https://hostupdate.vmware.com/software/VUM/PRODUCTION/main/vmw-depot-index.xml | grep ESXi-6.7.0-2019
Patching ESXi
Now you can install the latest patch in the time I’m writing this it’s the patch from May 2019 ESXi-6.5.0-20190504001-standard
esxcli software profile update -p ESXi-6.5.0-20190504001-standard -d https://hostupdate.vmware.com/software/VUM/PRODUCTION/main/vmw-depot-index.xml
There are two commands profile update and profile install, update keeps custom drivers and install does not. I’m always using the profile update command.
Now I have the update result message that the update was successful and I need to reboot my host:
Update Result
 Message: The update completed successfully, but the system needs to be rebooted for the changes to be effective.
 Reboot Required: true
Cleaning commands
You will need to ENABLE SSH on the host again because it is disabled by default after the reboot, If you forgot how see the image above.
As the message above told us we need to reboot the host in order for the changes to be effective
reboot
After the reboot we are going to close HTTPS access for the host machine from the VMware firewall
esxcli network firewall ruleset set -e false -r httpClient
And exit maintenance mode
vim-cmd hostsvc/maintenance_mode_exit
Now start your Virtual Machines and visit this tutorial in a few months when you will need to update your hosts again :)
Also, don’t forget to DISABLE SSH on your VMware hosts.