LG-Ericsson Aria SOHO – First Time Installation
If the cable wiring is all done, LG-Ericsson Aria SOHO can be installed in under an hour. Here is a simple manual how to do it right.
Aria SOHO hardware settings and DIP swithes
Before starting up and installing additional parts in the Aria SOHO system open the cover of the AR-BKSU (main cabinet) and put the SW2 to ON like showed in the picture below (highlighted in red).
This must be done prior installing additional cards/modules and EKSU.
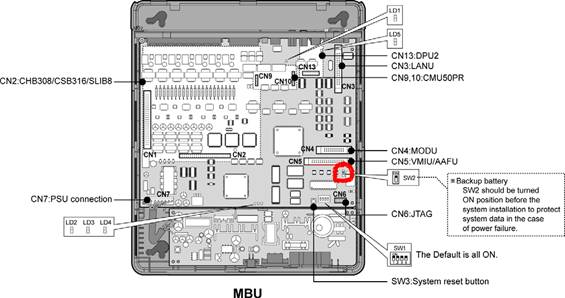
Once the SW2 is turned ON you can install the boards, which is in your case the AR-CSB316 and AR-EKSU. To connect the AR-EKSU use the links cable enclosed and connect it to the designated position on both cabinets.
Next step is installing the PC admin at your PC.
Install the application and connect to the Aria SOHO using USB cable (it is the standard USB cables used fro printers mostly).
Note: The USB driver for the Aria SOHO system is included with the PC Admin application and you won’t need to install anything additionally. Also note that the USB connectivity will NOT work with Windows Vista or Windows 7
Once the installation of cards is finished and the system is completed, and PC admin installed and connected to the Aria SOHO, start the system in the following order: First power ON the AR-EKSU and then AR-BKSU.
This is done in order for the system processor which is based at AR-BKSU to successfully read all the cards installed in the additional cabinet, AR-EKSU.
Note: Do not close the cover to the AR-BKSU yet, as you will need to click another switch once powered ON.
Next start the PC Admin and use User ID: Administrator and Password: 0000 for initial log on to the PC Admin.
- Go to Tools->Site Information and click on New to add new profile.
- Enter details (whatsoever) of the system and click Save.
- The new profile should appear under Site List. Right click the profile and chose Connect (USB).
- It will display warning that this method is for Aria SOHO only, and press YES.
- Enter Password dialog box will appear and use Password: 0000 to log to the PBX.
Once finished you are now logged to the Aria SOHO system.
Continue with basic settings like Local Information.
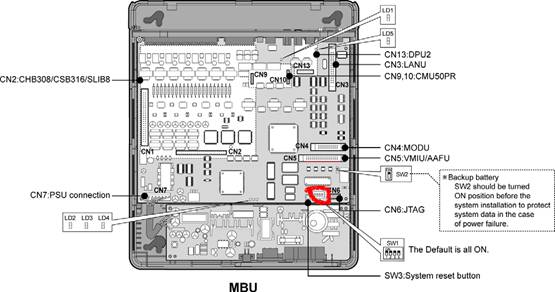
Open Pre-Programmed menu at the menu list and chose Local Information (PGM100). Chose United Kingdom from the countries list. Restart the Aria SOHO system. Once powered ON again set the pole 4 of the SW1 to Off. You can see the position of the switch in the picture below.It’s IMPORTANT as this is the switch that protects your database and changes you have made.
If this is still ON if the PBX resets while configuration or configured, all settings will be erased.
Aria SOHO Configuration Quick Setup
Numbering plan (PGM104)
Use the default. You can see the extension listed there in the order “Port Number” and “Station Number”. Aria SOHO works in that way that every Station Number is associated with the actual physical port on the Aria SOHO system. When you open the side coder of the PBX, you can see the ports (where the extensions are plugged in) in the following order: Starting from DKT i.e. port 1 and so on. So in case you need to change the extensions number just change the number which is associated with its port. In example: If we want to change the extension 103 which is by default given from the PBX, or 13 (according to which numbering plan we are using) just change the Station number 103 or 13 with the new number. It should be positioned on port 4.
CO Line settings
We’re going to assume that customer has 2 PSTN lines. If correct then connect the PSTN cables to the CO1 and CO2 plugs inside the PBX. Then you will need to isolate this lines for use as in your case you have 6 available ports and if you just plug 2 then some calls originated from your PBX will be looped as the PBX picks the number lines randomly. To accomplish this open “CO Line Base Program” from the Menu List and chose CO Line list. Open the dialog box and enter CO Num 1-6 in the empty boxes just below Refresh and Close buttons. After this press on “CO Attr I” button. New dialog box will open that will list the lines. By default all lines are placed in “CO Group 1” as you can notice in the first line “CO Group”. Right click the any of the CO Groups number and chose “Update Tool” option. An extended menu will appear below. In the menu below where it says “CO Num” enter 3 – 4 in the empty boxes below and from the drop down menu shown on the right (the first option) “CO Group” select 8. After you finish this press “Update” on the right of the box. With this step you have isolated the first 2 lines for use and remove the empty ones.
CO Group Access Station
Next step is to give privileges as to which stations can use the PSTN lines. In your case only 100 can use the outside lines. For this please open “Station Base Program” from the menu list and chose “CO Group Access Station”. The Box will appear with a drop down menu “CO Group”. Pick 1 from the drop-down menu and hit Refresh. On the left side the Station Numbers will show up. Right click on any of the station numbers and chose “Update Tool”. An extended menu will be shown on the right side. You will notice the empty boxes with marks “Start” and “End”. This is where you put the list of extensions that you want to manage. In your case put all extensions without the 100 (the master desk extension which need an access to the lines) i.e. Start: 101 End 132 (these are the extensions that needs to be restricted of line use). After you finish this press “Get”. In the “CO Group” Box on the right side, all of the groups will be shows. These ones that are marked are the groups that these extensions has access to. Because we placed the first two lines (CO1 and CO2) for use only in CO Group 1 we should now remove the access from all of the groups for these extensions. Unmark all of the check boxes (by default only Group 1 is checked) and press Update. With this step we have restricted access to PSTN lines for all extensions except the 100 which still has access to CO Group 1 as we do not apply these settings to the desk phone.
CID
Next step is to enable CID. Go to “CO Line Base Program” menu and pick “CO CID Attributes” (PGM147). Once there chose the FSK signaling method and enable CID (I mentioned FSK because it is used here. You will need to consult with PTK to find out the right signaling method. DTMS is also supported). Please note that you need to check how PTK sends the CID information and chose the appropriate ring sequence. Here the CID is sent after the first ring, so we usually setup the PBX to wait 1 ring before it sends the call to the telephone set.
Call Processing Tone Detection
Enable CPT for PSTN tone detection and avoiding problems about disconnect tones etc. To accomplish this enter PGM140 in the PGM No. option under search tab or open “CO Line Base Program” menu and chose “CO Line List” from the sub-menu. In the empty boxes on the top of the menu, right where it says CO Num, enter 1-2 as these are the lines currently used and the press on the “CO Attr II” from the options placed upper on the menu box. New menu-box will open. Right click anywhere in the box and click the “Update Tool”. An extended menu will open down in the box. In the “CO Num” box in the down menu enter 1-2 and find a line where it says “Line Drop using CPT” and “Busy/Error CPT Detect”. Check the boxes and chose ON from the drop-down menu. After that press Update. Now the lines are enabled for CPT.
CO Ring Assignment
Final step would be to setup the Ring Assignment rule for incoming calls. In order to set up this feature please chose “Co Line Base Program” from the Menu List and then “CO Ring Assignment” from the sub-menu. A menu box will appear with an option to chose the “CO Num” from the drop-down menu. Chose 1, then hit Refresh and after this right click anywhere in the menu below and chose “Update Tool”. (Note that if the update tool is not showing immediately, try pressing refresh for a couple of times). Once the update menu appear chose Start: 1 and End: 2 in the boxes affiliated to the CO Num, chose “Day” from the drop-down menu under Mode, Type: Station, Number 100 (or the number which is the main/desk telephone). Since you don’t have AA and CCR and you have only one desk telephone you won’t need Night, Weekend and On Demand settings. After you finish this click update. This will also enable all incoming calls to be distributed to the desk/reception telephone.
LG-Ericsson Aria SOHO has a lot of features that we can’t cover right now, but keep checking our blog for posts for the more advanced options.





HAVE A NICE DAY.
thanks
[…] http://www.vionblog.com […]
I have this system and I’m fighting over a month to find configuration info about it, using pcadmin. Fortunately I found your site!! It could help me great if you told me where to find instructions on how to configure call forward from an outisde line to an outside line, using pcadmin for aria soho. Or if it is easy and possible to post the steps here! Thank you in advance!
For digital phone instead of the codes press the [DND/FOR] button To activate call forward from a SLT, 1. Lift the handset. 2. Dial call forward code 5 5 4 (the code can be found and changed in PGM106) 3. Dial call forward type. 4. Dial station number or Group speed number to receive call. Or, press # key to forward to VMIB. 5. Replace the handset and go on-hook. To deactivate call forward from a SLT, 1. Lift the handset. 2. Dial call forward code 5 5 4 and #. Or, dial 5 5 9 (the code can be… Read more »
I need to activate call forward or maybe call transfer so as, when an off-net call arrives if no one answers on no station then the call is transferred to an off-net number. For example when no one is in the office, all off-net calls must be forwarded to a mobile. Thank you in advance!!
Here is what you need to do on a digital phone, if from SLT replace [DND/FOR] with code 5 5 4 Call Forward, Station Off-net (Unconditional, No answer) Description Stations allowed call forward access can forward intercom and transferred CO Line calls to a directory number (telephone number) outside of the system. When a call is received, the system will access an outgoing CO Line and dial the telephone number entered by the user. If a station assigned off-net call forward received a call from internal caller and external caller, the call is forwarded to off-net unconditionally (Code 5) or… Read more »
I did this and that’s what happens: When an internal caller calls that particular station in my case an SLT, from which I programmed the call forward, it forwards the call to the off-net number. But when I call from a mobile to the office number it doesn’t forward it to the off-net I programmed. Here is the scheme: calling from e.g. 105 to 106(station from which I programmed the callForward) it forwards the call to the speed cell, as I assigned it earlier, to an off-net mobile. When calling from a mobile to the office’s external number, the call… Read more »
do you have idle CO line for your outgoing forward call? you need one CO line to receive the incoming call and one CO line to make the outgoing call. Usually we overlook this :)
There is a condition:
If there is no idle CO Line, Off-net Call Forward is not activated.
There is a second CO line. And it is idle
Try assigning the external line to a station not a terminal group, set forwarding to that station and see what happends, maybe you can’t assign forward to a terminal group call. if that is the case try with ACD group. There are more settings.
Regards
How can I assign the one of the lines to a station? I left two stations out of the terminal group so as to assign call forward on them but i don’t know how to particularly assign the line to a station. Also one of conditions is to have on both lines loop/disconnect detection activated. Where do I check this? Thank you for your patience!
look at: CO Ring Assignment above in my post, you need to go to set it to station.
Regards
Help
Emg I need to connect sip trunks
i need to reflash my mpb100 after bad update
jtga connection or other solution thinks for your help
incoming call landing
hii i plz need the manuel how to make my first install of aria soho LG-ERECSSON ? plz help me
The basic things are explained in the post above. There are tons of features on the PBX
Try this quick start guide: http://www.lg-nortel.es/downloads/quickstartguidest.pdf
Hello Hikola,
I cannot forward a call from one station to another…
In fact my goal is to let DEKT on forward 1 (unconditional) but when my colleague answer (STA 109) it’s impossible to forward the call to another stationa (STA105 for example).
I put to all stations call forward value FLEX2+1 (ON) in 111 programming mode, but it doesn’t work. When any station press “R” for transferring the call then it’s stopped…
Where do I wrong?
Thanks.
If the call drops when you press R to transfer to another station than your SLT Hook Flash timers are wrong.
Go to PGM180-182 (System Timers) and adjust SLT Maximum Hook Flash TImer and SLT Minimum Hook Flash Timer. This are miliseconds and some DEKT’s are with different flash timers 300ms, 600ms, etc.
I think the default SLT Maximum Hook Flash Timer is with value: 50 (multiplied with *10 = 500ms) and if your flash timer on the DEKT is 600ms the PBX will not register it as flash and it will disconnect the call.
I hope this helps.
Regards
Hello sure,
I have two line hooked in CO port(pabx aria soho), when i click on flex btn to use second line CO ,i get this message Acces Denied how to enable it
Thank you
Hello,
In PGM 141 “CO Attributes”, Check the CO2 “CO Group” attribute and then in PGM 117 “CO Group Access” grant access access to the station to use the CO Group from PGM 141.
This should remove Access Denied message from your phone and s=you should be able to use the second line.
If you want to can add CO2 to group 1 and that every station will use CO1 and CO2 when they press 9 for outside access.
Hope this helps.
Regards,
Nikola
HELLO,
i receive calls in CO2 and CO3 but I can’t make calls using CO2 & CO3 ,I think i need to program flex button but i don’t know how
my My pbx is ARIA Soho lg ericsson ,and ldp7224
Hello,
I’ve replayed you on your previous post you can use flex buttons or you can add your lines in group 1 and use them round-robin when pressing 9.
You can also select individual line by pressing 880X (X is CO number ex. 8802 selects CO2, 8803 selects CO3), but if they are not in group 1 you must add the extension to have access to that group in CO Group Access PGM 117.
See my replay on your previous post.
Regards,
Nikola
Hi there,
I am hoping you are able to help me, we
have recently acquired a LG Nortel Aria SOHO LDP – 7208D, and we are having a troublesome time
trying to reprogram the unit for our business, we are not able to access the
programing menue and keeps saying access denied etc, are you able to send me
the installation manual and programing manual for this unit, I have the cd but
its in Chinese. I would truly be grateful if you could help even for a mater
reset to start form fresh.
Hello, I wanted to find out if there is any way to cancel the systems greetings message.
Thanks,
Hello, I want to add an extention to the system (i have tha wright “card”), how do I connect another machine? Thank You, David
Hello ,
I have a problem with my internal telephone network. I have a standard aria soho and two appariels LDP 7224d, the problem is I can not make an outside call on the two lines that I have. I received the “CO LINE BUSY 001 – Queuing – [CALLBK].) – CALLBK) for both lines and hoses are red booties.
how I can reconfigure both bottons for Flexibles I can make calls.
T/P 450 + FLEX BUTTON 15 + HOLD/SAVE
Hi, I got a problem with my aria soho AR-BKSU when there is an incoming outside call the phone does not ringing but the light indicator that say’s there is an incoming active call from outside.
Hello,
please how can I install PC admin programin on win 7 ?
HAVE A NICE DAY.
thanks