Extend LVM Partition (Explained)
It is time to take advantage of using LVM volumes when installing Linux servers. I got a Virtual Machine that I’ve used for a while now and I run out of disk space. So here are my steps on howto extend LVM partition.
Add additional Disk Space
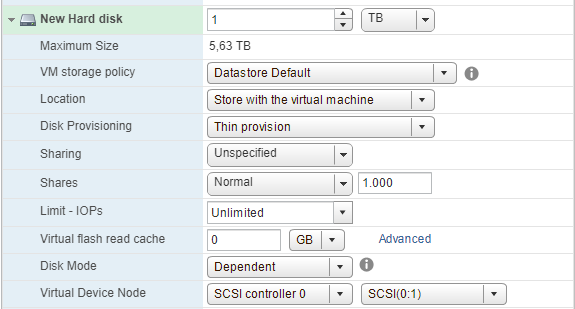
I’ve chosen to add an additional virtual disk not to increase the capacity on my current one. I’ll be adding an additional 1TB thin-provisioned disk and reboot the system.
Now I have 120GB /dev/sda disk and 1TB /dev/sdb disk that I need to add into my LVM group. To check that I need to type lsblk
root@linux01:~# lsblk
NAME                   MAJ:MIN  RM  SIZE    RO  TYPE MOUNTPOINT
sda                    8:0      0    120G   0   disk
├─sda1                 8:1      0    487M   0   part /boot
├─sda2                 8:2      0    1K     0   part
└─sda5                 8:5      0    119.5G 0   part
 ├─linux01--vg-root    252:0    0    118.5G 0   lvm  /
 └─linux01--vg-swap_1  252:1    0    976M   0   lvm  [SWAP]
sdb                    8:16     0    1T     0   disk
sr0                    11:0     1    62M    0   rom
Partition the new disk
Now we need to partition the new disk with Linux LVM file type 8e with fdisk. In my case, the choices will be: n(for new partition), p(for primary), 1(for partition number sdb1), then few hits of Enter for the defaults, After that I’m changing the partition type to 8e so I press t(to change partition type) and 8e(for Linux LVM) and at the end w to write the changes
root@linux01:~# fdisk /dev/sdb

Welcome to fdisk (util-linux 2.27.1).
Changes will remain in memory only, until you decide to write them.
Be careful before using the write command.

Device does not contain a recognized partition table.
Created a new DOS disklabel with disk identifier 0xc2ce9a65.

Command (m for help): n
Partition type
 p primary (0 primary, 0 extended, 4 free)
 e extended (container for logical partitions)
Select (default p): p
Partition number (1-4, default 1): 1
First sector (2048-2147483647, default 2048): <enter>
Last sector, +sectors or +size{K,M,G,T,P} (2048-2147483647, default 2147483647):<enter>

Created a new partition 1 of type 'Linux' and of size 1024 GiB.

Command (m for help): t
Selected partition 1
Partition type (type L to list all types): 8e
Changed type of partition 'Linux' to 'Linux LVM'.

Command (m for help): w
The partition table has been altered.
Calling ioctl() to re-read partition table.
Syncing disks.
Now to check that everything is OK we’ll type fdisk /dev/sdb -l and this is what you should see at the end of the output:
Device     Boot Start         End     Sectors  Size   Id  Type
/dev/sdb1        2048  2147483647  2147481600  1024G  8e  Linux LVM
NOTE: You may get an error message at the end of the ountput like the one below:
The partition table has been altered!

Calling ioctl() to re-read partition table.

WARNING: Re-reading the partition table failed with error 16: Device or resource busy.
The kernel still uses the old table. The new table will be used at
the next reboot or after you run partprobe(8) or kpartx(8)
Syncing disks.
Just run partprobe again:
root@linux01:~# partprobe
root@linux01:~#
Extend LVM Partition
Now we are going to convert the physical volume into a logical volume for use in LVM groups.
root@linux01:~# pvcreate /dev/sdb1
 Physical volume "/dev/sdb1" successfully created
Check the Volume Group name and extend it in our case the Volume Group Name is linux01-vg (the name is under the first VG)
root@linux01:~# vgs
 VG        #PV #LV #SN Attr   VSize    VFree
 linux01-vg 1  2   0   wz--n- 119.52g  36.00m
root@linux01:~# vgextend linux01-vg /dev/sdb1
 Volume group "linux01-vg" successfully extended
Now we are going to add all additional space that we have from the new disk
root@linux01:~# df -h /
Filesystem                   Size Used Avail Use% Mounted on
/dev/mapper/linux01--vg-root 117G 78G  34G   71%  /
root@linux01:~# lvextend /dev/mapper/linux01--vg-root /dev/sdb1
 Size of logical volume linux01-vg/root changed from 118.53 GiB (30344 extents) to 1.12 TiB (292487 extents).
 Logical volume root successfully resized.
if Ubuntu ext4:
root@linux01:~# resize2fs /dev/mapper/linux01--vg-root
resize2fs 1.42.13 (17-May-2015)
Filesystem at /dev/mapper/linux01--vg-root is mounted on /; on-line resizing required
old_desc_blocks = 8, new_desc_blocks = 72
The filesystem on /dev/mapper/linux01--vg-root is now 299506688 (4k) blocks long.
if CentOS xfs:
[root@server1 ~]# xfs_growfs /dev/mapper/centos_server1-root
meta-data=/dev/mapper/centos_server1-root isize=512 agcount=6, agsize=3276800 blks
         =                      sectsz=512 attr=2, projid32bit=1
         =                      crc=1 finobt=0 spinodes=0
data     =                      bsize=4096 blocks=17300480, imaxpct=25
         =                      sunit=0 swidth=0 blks
naming   =version 2             bsize=4096 ascii-ci=0 ftype=1
log      =internal              bsize=4096 blocks=6400, version=2
         =                      sectsz=512 sunit=0 blks, lazy-count=1
realtime =none                  extsz=4096 blocks=0, rtextents=0
data blocks changed from 17300480 to 69728256
And now confirm that we have the space that we allocated
root@linux01:~# df -h /
Filesystem                   Size  Used  Avail  Use%  Mounted on
/dev/mapper/linux01--vg-root 1.1T   78G  1001G  8%    /
So, from 120GB now we have 1.1TB of space which should be enough for the purpose of this Virtual Machine.
Logical Volume Manager (Linux): https://en.wikipedia.org/wiki/Logical_Volume_Manager_(Linux)